How to use the Hyperlink Editor
The Hyperlink Editor can be found in the FSI Server webinterface when you publish a catalog. This link editor enables you to conveniently add hyperlinks and icons to your online catalog.
The tab “Edit Hyperlinks” provides access to the JS hyperlink editor for FSI Pages.
The editor recognizes existing hyperlinks and enables you to change them as well, i.e. links created with the old Flash Hyperlink Editor are shown in the new editor and can also be changed, but they will be saved in a different format. As a result, links created or changed with the new editor are not compatible with the old FSI Pages Flash versions, they only work with the new FSI Pages JavaScript versions.
This tutorial will help you to get started with the editor.
- 1. General
- 2. Shortcuts
- 3. Browse through the catalog
- 4.Zoom/Pan
- 5. Adding Shapes
- 6. Selecting Links/ Link Shapes
- 7. Link Data
- 8. Transforming Links/ Link Shapes
- 9. Move Shape to another Link
- 10. Delete/Cut/Copy/Paste
- 11. Remove Transformation
- 12. Undo/Redo
- 13. FullScreen
- 14. Save
- 15. Adding SVG for own Shapes/Icons

1. General
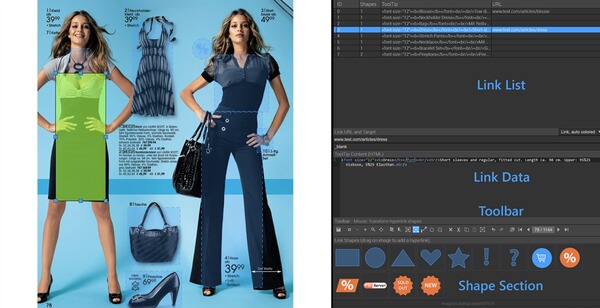
The link editor consists of different sections:
On the left side you will see the single pages of your catalog, the right side is sectioned into 4 sections:
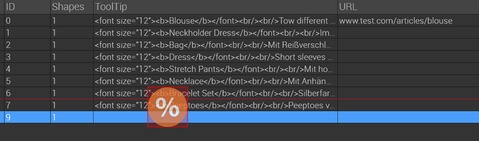
The link list shows all links which are embedded in the current site of your catalog. You can move the links to decide which one should be in the foreground by dragging them on the desired position in the list. This is helpful if shapes are overlapping, the position decides which link is active in the overlapping section on mouse over. The link at bottom of the list is in the foreground.
Link Data shows the info for the selected link.
The tool bar allows you to scroll through the catalog and add and change links.
New Shapes contains a preselection of shapes and icons which can be added to the site. It’s also possible to add your own shapes to this section, for more information please see Adding SVG for own Shapes/Icons.
The editor differentiates between Links and Icons.
![]()
You can choose between:
- Link, auto colored: transparent filling, change color & ant line on mouse over or while being pressed
- Link, original color: opaque filling, do not change color on mouse over
- Icon: displayed with the original color, can have tooltips, but they can not be clicked (i.e. they are no hyperlinks)
Furthermore, you are able to change a Link in general or just a Link Shape. A link can consist of one or multiple link shapes. If a link has only one shape assigned, then link equals link shape – i.e. the select/transform link and select/transform link shape action do the same.
The editor differentiates between Links and Icons.

2. Shortcuts
- CTRL + S: Save
The following shortcuts apply, if focus is not in an input or outside link editor:
- CTRL + Z: Undo
- CTRL + YZ: Redo
- CTRL + A: Select all
- CTRL + D: Select none
- CTRL + X: Cut
- CTRL + C: Copy
- CTRL + X: Paste
- CTRL + M: Remove Transformation from selected links/shapes
- CTRL + 1 – CTRL + 9: Mouse Modes
- DELETE: Delete selected links/shapes
- Arrow left: Previous Page
- Arrow right: Next Page
- Pos 1: First Page
- END: Last Page
- Arrow Up: Select previous link in link table
- Arrow Down: Select next link in link table
- SPACE BAR: Zoom out
3. Browse through the catalog
![]()
You can browse through the catalog with the FSI Pages buttons. You can type a page number into the box and the editor will switch to the corresponding page.
4. Zoom & Pan
![]()
The known FSI Viewer buttons can be used to zoom into the page and to move the section that is visible. You can also move the section while using the navigator window.
5. Adding Shapes
![]()
In order to add a new link to your site, you can drag and drop any shape for the New Shapes section to your site or use the Draw Polygon or Free Form buttons to create new shapes. With the Polygon drawing tool you can close the shape by either connecting the last point to the first point or by pressing CTRL while drawing the end point. The Free Form shape ends whenever you stop drawing.
6. Selecting Links/ Link Shapes
![]()
With the corresponding buttons, you can either select the complete link or just one link shape. After selecting it, you can edit the link data.
7. Link Data
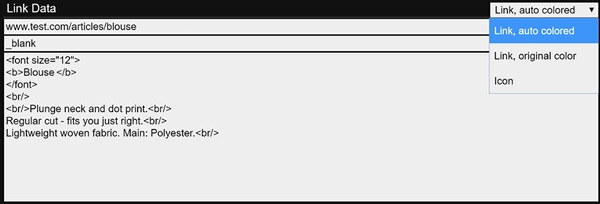
The following changes can be made:
- type: decides as which type the shape will be displayed:
- Link, auto colored: have a transparent filling and also change color and have an ant line on mouse over or while being pressed
- Link, original color: do not change color)
- Icons: will be displayed with the original color. They can have tooltips, but they can not be clicked
- URL of the link: specifies the URL which should be opened when clicking on the link
- URL target of the link: specifies where to open the linked document (_blank, _self,…)
- tool tip of the link – adds tool tips displaying HTML formatted text to links on mouseover
8. Transforming Links/ Link Shapes
![]()
With the corresponding buttons you can move or transform the whole link or just one link shape. You can use CTRL and drag a handle to rotate the shape. If you want to undo your transformation, you can either use the Undo button or – if you want to restore the original state, use the Remove Transformation button.
9. Move Link Shape to another Link
![]()
With this button it is possible to move a link shape to another link. To do so, click on the link shape you want to move and then drag the shape onto the link you want to merge it with in the link list. If you move the shape to an empty space in the list, a new link will be created.
 />
/>
10. Delete/Cut/Copy/Paste
![]()
You can delete link, cut or copy them and paste them to another location or another page with the corresponding buttons.
11. Remove Transformation
![]()
This button removes all transformation from the selected link shapes or links.
12. Undo/Redo
![]()
You can undo or redo your steps with these buttons. The editor automatically switches to the page the changes were made on.
13. FullScreen
![]()
For better usability, you can display the link editor in full screen mode.
14. Save
![]()
By clicking on the Save button or pressing CTRL+S, your changes will be saved. The hyperlinks will be saved to the metadata of the image as FSI Extra, which you can see in the Metadata Tab.
15. Adding SVG for own Shapes/Icons

It is possible to add you own shapes to the New Shape section. The shapes consist of SVG files which are stored in the
/_service_files/Link Editor Shapes/
folder of your FSI Server Web Interface.
In order to add custom shapes, you need to group your icon and add one or more classes to the group in your SVG file:
- class=”fsi-pages-link-shape” – displays the shape with the original color setting
- class=”fsi-pages-link-shape fsi-pages-link-auto-color” – displays the shape with the auto color setting
- class=”fsi-pages-link-shape fsi-pages-link-icon” – displays the shape with the icon setting
Afterwards, upload the SVG file to the /_service_files/Link Editor Shapes/ folder. The shape will be displayed in the New Shapes section of the link editor.