Preface
Virtual 360 views are usually being created by taking photo shots of an object from different viewing angles advancing the rotation of the object (or the camera) by a certain number of degrees per shot. The number of shots for a single rotation around the Y-axis should be between 12 images (fast loading time) to 36 images (very smooth rotation, but longer loading time). In the following samples we will assume 12 individual shots which means advancing the rotation by 360 / 12 = 30 degrees per shot.
Please note that this tutorial is on publishing images. For information on photo equipment and techniques to take shots like that, please see the page on 3D photography.
In the text below we will describe publishing 3D views from multiple source images (recommended for FSI Viewer version 4 or above) as well as the alternative method of using composed images holding multiple shots in one image.
A) Using Individual Source Images (recommended)
The fastest and most comfortable way to create “virtual 3D views” is uploading or copying all images belonging to a 3D presentation to an individual folder on your FSI Server using the web interface. The file names should alphabetically reflect the sequence so that the images will be sorted correctly by FSI Server,
e.g. “image_001.tif”, “image_002.tif”,…
You can either:
a) Upload the files using the web interface
- Create a ZIP file from the individual source images (TIFF, JPEG or any other supported format)
- In the web interface, navigate to the folder you want to upload the images to
- Click the “Upload” button
- In the upload window, click “Browse” and select the ZIP archive
- Click “Send files” and wait for the upload to complete
FSI Server will convert the images to the optimized format once the upload finishes.
b) Copy / Upload the files directly or via FTP
- Create a new sub-folder on of your FSI Server
- Copy the source images to the new sub-folder.
After copying / uploading the files:
- Open the FSI Server web interface
- Navigate to the folder you want to upload your images to Once the upload has finished, select the upload folder in the web interface and click “Publish to Web” => “Publish as FSI Viewer 360“:
In case the 3D view contains more than one rotation (e.g. a rotation around the X-axis and one or more rotations around the Y-axis), please add the corresponding “SceneSet” parameter in the “Additional Parameters” field in the “Publish” tab, e.g. “SceneSets=1-12;13-24;25-36”
B) Using a single Composed Source Image
In some cases (or with FSI Viewer prior to version4) you might prefer using composed source images. A composed image is a huge image containing all shots in a single image. The sequence of the images is left to right, top to bottom.
There are a number of ways and different software to create composed images. The procedure below describes using the Adobe Photoshop CS2 option “Contact Sheet II” on a sample, consisting of 12 images, each 4992 x 3328 pixels:
- Select “File” => “Automate” => “Contact Sheet II”
- In the dialog:
- Click “Browse…” and select the folder containing the images
- Choose the number of images in the horizontal and vertical directions that suits the number of source images best (e.g. 12 images => 3 x 4)
- Calculate and enter the resulting “width” and “height” of the entire image
- (colums * image width x rows * image height, eg. = 14976 x 13312)
- Uncheck “Use Auto-Spacing” option
- Enter the number of “columns” and “rows”
- Set Vertical and Horizontal Spacing to “0”
- Check the output to the right: “W:xxx pix” and “H:xxx pix” must match the size of the individual image size:
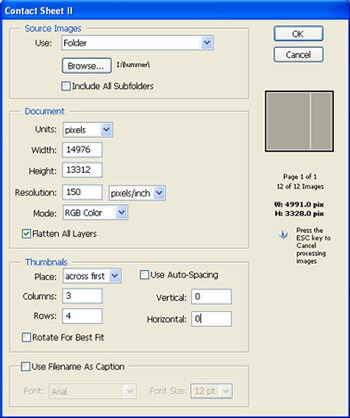
- Click “OK” and save the file as “TIFF”.
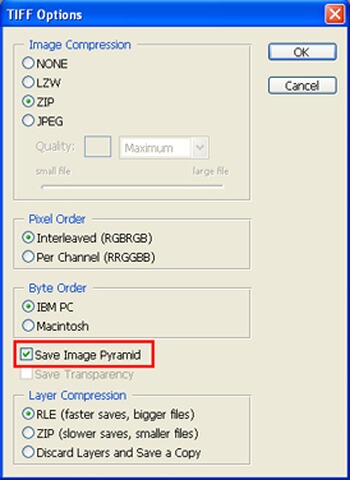
In the “Save as TIFF” dialog please choose “ZIP Compression”.
A very important setting for the eRez imaging server performance is the “Include Image Pyramid” option:- If you plan to upload the image to FSI Server (recommended),
please uncheck the image pyramid option. FSI Server does not need an image pyramid. - If you plan to upload the image to eRez, please check the image pyramid option.
(Saving the file will take quite a while depending on the image size)
- If you plan to upload the image to FSI Server (recommended),
